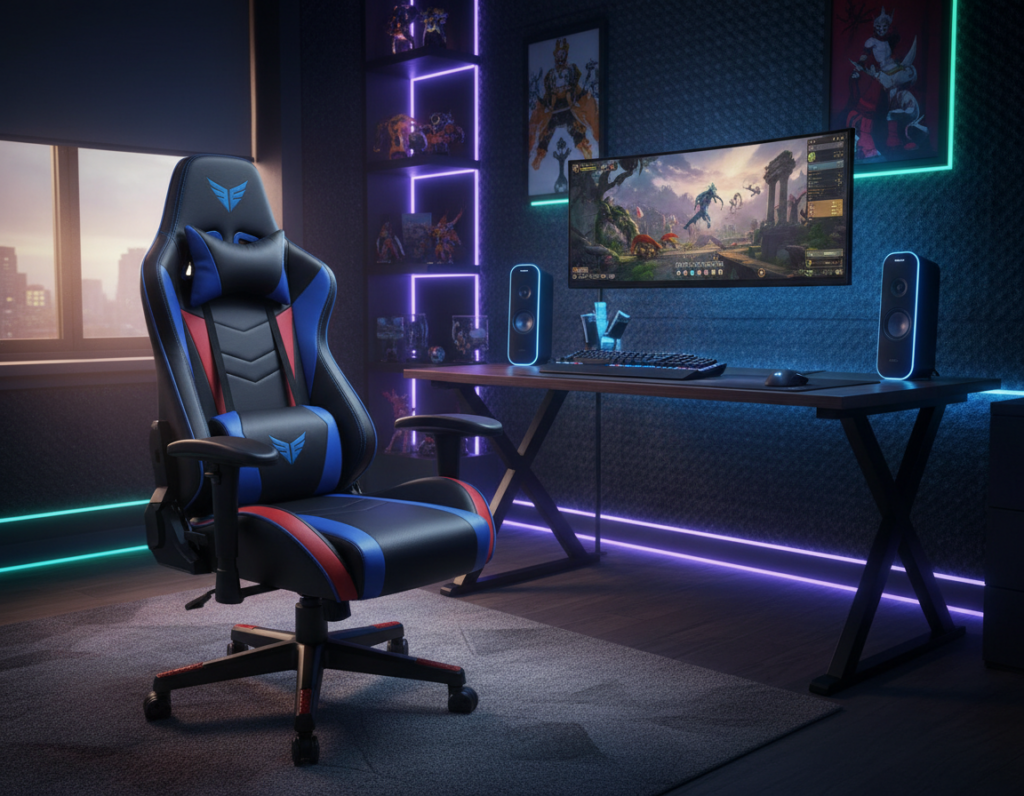
Eric from Washington State fits a high-performance, tech-heavy rig into a compact 9.1 m² room. He spent about $5,000 to reach a comfortable balance of power and style. His dual-display lineup pairs an LG 32GN650-B Ultragear with an MSI Optix G271, driven by an i5-13600KF and a Sapphire PULSE 6800 XT.
The core idea is simple: save floor area while keeping quality and comfort. Eric uses a custom-welded steel frame to support the tabletop and built-in shelves. This choice hides cables, adds sturdy support, and clears the floor for better flow.
Smart lighting, RGB accents, and personalized keyboard choices make the room feel unique. He adds wall hooks for headset and mouse storage and plans tabletop height to suit long hours of work and play.
For tips on designing memorable tech spaces and user engagement, see this guide on crafting memorable tech experiences.
The Appeal of a Floating Gaming Desk Setup
A wall-mounted work surface can change how a small room feels and performs. Baris turned a closet in Georgia into a study by installing a wall-to-wall suspended table that frees floor space and boosts utility.
Benefits of Floating Designs
Clear floor area: Removing legs reclaims square footage and creates room for storage or a tucked-away chair.
Custom height: Homeowners can set the height to suit long hours at the computer, improving posture and comfort.
Aesthetic Versatility
All the rage in modern home offices, this style offers a clean, minimalist look. Baris’s father, who built twelve desks since 2013, calls this the most effective choice for compact rooms.
- It makes the computer and gaming gear the visual focus.
- It gives a professional feel without bulky furniture.
- With careful planning, the result supports both work and gaming use.
In short: A suspended desk is a smart way to maximize function and style in small spaces while keeping storage options flexible.
Maximizing Floor Space in Small Rooms
A well-measured wall-length counter makes the most of tiny footprints. Baris proved this by converting a walk-in closet into a dual-purpose work area that supports both gaming and study tasks.
The butcher block countertop was 8 feet long and needed precise cuts to fit an 80-inch wall-to-wall span. Accurate measurements ensured a snug fit and left room for under-counter storage.
He installed two distinct work zones: one for intense gaming and programming and one for writing and study. This separation kept computer gear organized and preserved clear floor space for movement.
Practical storage like drawer units under the table keeps clutter hidden and improves room flow. Careful planning of size, position, and storage transforms a cramped home room into an efficient, multiuse area.
- Wall-to-wall surfaces reclaim floor area.
- Butcher block provides a durable computer station that can be cut to fit exact room size.
- Under-desk storage preserves movement and keeps work zones tidy.
Essential Materials for a Sturdy Build
Stability and longevity come from making smart material and framing decisions. This section compares metal and wood choices so readers can pick the best path for their room and weight needs.
Steel Frame vs Wood Supports
Steel frames deliver exceptional rigidity. Eric and his father welded a custom steel frame that supports the tabletop, headboard, and shelving. Their build also includes a built-in cable rack that hides wiring and improves longevity.
Wood supports offer warmth and ease of DIY. Baris used 2×4 and 2×2 supports fastened into studs to hold a heavy butcher block countertop. When installed correctly, wood carries multiple monitors and a high-end PC without sagging.
- Choose steel for maximum weight capacity and a professional look.
- Choose lumber for cost-effective, home-friendly installs that match warm decor.
- Always use quality materials — butcher block outlasts particle board and preserves the integrity of the entire frame.
Tip: Design the frame to include hidden cable routing so the workspace stays tidy and functional.
Planning Your Workspace Layout
A practical workspace begins with measured marks and a clear placement plan. Builders should mark the wall at 27.5 inches to allow for countertop thickness and reach a final desk height of 29 inches. This small adjustment guarantees ergonomic comfort for long hours of work and gaming.
Positioning shelves and drawer units matters. Place storage where it keeps essentials within reach but does not block legroom. Eric arranged his computer and guitar recording gear so schoolwork fits beside them without crowding the room.
Tip: Confirm the frame and supports align with studs and weight points before fastening the countertop.
Practical checks:
- Set final height to 29 inches and mark wall at 27.5 inches first.
- Plan shelves to hold accessories and extra storage for controllers, cables, and paperwork.
- Design the frame placement to carry the load of computer towers, monitors, and audio gear.
Outcome: A well-planned layout keeps the room tidy, boosts productivity, and makes the workstation versatile for hobbies and study.
Selecting the Right Butcher Block Countertop
A well-selected butcher block countertop becomes the backbone of a compact home workspace.
Baris chose an 8 ft × 2 ft × 1.5 in birch slab that cost $219. That single board serves as the primary surface for both the gaming desk and the study area in his room.
Butcher block outperforms IKEA-style panels for durability and customization. It resists long-term sagging and takes finishing work well, so the owner can stain or seal it to match shelves and trim.
Value matters: the price of a quality slab often competes with mass-produced furniture while lasting much longer. A solid wood top gives a stable base for a computer and other gaming accessories.
Tip: Measure the room and plan cuts so the countertop fits wall-to-wall and leaves room for storage and leg clearance.
- Choose size by the room’s needs and available space.
- Prefer solid wood for long-term durability and easy refinishing.
- Match finish to existing shelves and storage for a cohesive look.
Preparing Your Desktop Surface
A careful finish turns a raw slab into a resilient surface built for daily use. Proper prep protects the surface from spills, abrasion, and heat from a computer. It also improves how the piece reflects natural light in the room.
Sanding Techniques
Begin with 150 grit on a random orbit sander to level the butcher block and remove mill marks. Follow with 220 grit for a smooth, tactile finish.
After initial sanding, wipe the surface clean with a tack cloth. This step removes dust and prevents grit from marring the stain.
Staining and Finishing
Baris used Minwax Special Walnut applied with foam applicator pads for an even, quick coat. He skipped a separate pre-stain to keep a rustic tone.
For protection he applied wipe-on polyurethane and sanded between coats with 2000 grit to remove bumps and create a flawless plane for mouse and keyboard.
- 150 & 220 grit create a professional feel for the desk.
- Foam pads speed stain and seal application during the setup.
- Final 2000 grit sanding ensures smooth use and easier maintenance for gaming and everyday work.
Tip: Proper finishing saves time on repairs and keeps the workspace attractive in a busy home.
Installing Wall Supports for Maximum Stability
Secure wall supports form the backbone of any reliable wall-mounted workspace. He began by marking stud locations and confirming measurements for consistent height.
Installing the frame into studs is mandatory to hold the weight of a computer and the tabletop. Baris used 2 1/2 inch deck screws to fasten 2×4 supports, which delivered the pull-out resistance needed for long-term use.
The side supports were cut to 18 inches so they stay hidden under the 24-inch deep surface. This keeps the room tidy and preserves the clean look of the workspace while allowing added storage or shelves above or below.
Leveling is critical. A warped 2×4 can make the entire surface look wonky even if screw lines appear straight. He checked with a spirit level across the frame before final fastening.
- Attach supports to studs to secure weight capacity for computer towers and monitors.
- Use proper fasteners — 2 1/2 inch deck screws provide durable hold.
- Keep side rails shorter than the tabletop depth to hide supports and maintain a neat profile.
- Confirm level side-to-side to guarantee a reliable work height and a flat surface for both work and gaming.
Note: A sturdy steel or wood frame fixed to studs allows safe addition of shelves and other storage without compromising stability.
Integrating Cable Management Solutions
Tidy cable runs turn a crowded workstation into a calm, efficient area. Good routing keeps the room clean and improves daily work flow.
Hidden Cable Racks
Eric built a built-in cable rack into his steel frame to hide power and data lines. That addition keeps his gaming desk and computer gear tidy without visible cords hanging down.
Handan helped route power cords and attach cables under the surface using hooks and Velcro ties. This approach preserves floor space and simplifies cleaning beneath the table.
- Integrate a cable rack into the frame for a professional look and long-term reliability.
- Use hooks and cable ties under the table to prevent tangles and keep power cords secure.
- Design channels that allow easy swap of computer accessories without disturbing the entire system.
Tip: Concealed wiring not only improves aesthetics but also makes adding lighting and storage easier later.
Enhancing Comfort with Ergonomic Accessories
Well-chosen peripherals turn a tight room into a comfortable, productive home workspace. Eric relies on a Razzor Ergonomic Office chair to stay supported during long gaming and school sessions.
A custom keyboard like the Monsgeek M1 improves typing feel and reduces strain. Pairing that keyboard with a responsive mouse helps keep hands relaxed and accurate during intense play or focused work.
Good accessories matter: a supportive chair, a low-friction mouse pad, and a keyboard set to the right height cut fatigue. Proper cable routing keeps the tabletop clear and gives more room to move the mouse.
Tip: Invest in one high-quality ergonomic piece first—often the chair—then add a custom keyboard and cable management to complete the professional-grade setup.
- Ergonomic chair for long sessions.
- Custom keyboard for comfort and speed.
- Cable management and smart storage to free the desk surface.
Incorporating Natural Lighting and Ambiance
A large window can turn a compact area into a relaxed, productive zone. Eric values the sunset light that filters between the trees and warms his room. That natural glow reduces the need for daytime artificial light and makes the space feel connected to the home.
Natural light often beats RGB for long-term comfort. While RGB remains popular, Eric prefers warmer tones and subtle ambient lamps to complement daylight. This choice keeps his computer area calm for both work and play.
Placement matters. Position the desk so sunlight hits the side or back of the monitor to avoid glare. Add low-profile blinds or a sheer curtain to soften harsh rays without losing brightness.
“A balanced light plan improves mood and focus throughout the day.”
- Use the window as primary light and add warm ambient bulbs for evenings.
- Keep storage near the wall to preserve open floor space and light flow.
- Adjust monitor angle and coverings to control reflections and eye strain.
Customizing Your Setup with Personal Touches
Personal items transform a functional surface into a room that tells a story. Eric layered guitar gear, a snowboard plate, and a few framed prints so the area reads like his life, not a catalog spread.
Simple display choices make a big difference. Add shelves and hooks to show collectibles without cluttering the main work area. This approach frees floor space and keeps important items within reach.
Avoid relying only on RGB lights. Instead, pick meaningful accessories: a custom keyboard, a specialty mouse pad, and a small amp or photo frame. These subtle touches personalize the workspace and improve daily comfort.
“A personalized setup is more than a computer station; it reflects identity and makes the room feel like home.”
Finally, tune the frame and cable runs to suit the user. Thoughtful storage and neat routing keep the surface usable and let personal items stand out.
- Use shelves and hooks to display gear and free floor space.
- Choose personal accessories over generic lighting.
- Customize the frame and cable plan to preserve both style and function.
Balancing Productivity and Gaming Needs
Eric structures his day so creative work and play each get dedicated blocks of time.
He records guitar tracks in Tracktion Waveform and schedules short, focused sessions for music before switching to the computer for study. This clear division helps him finish school tasks first and enjoy downtime without guilt.
Small habits matter: he sets micro-goals and uses timers to beat procrastination. That approach keeps the room tidy and the desk ready for either task.
Ergonomic accessories, good light, and planned storage keep comfort high during long bursts of work or gaming. A tidy gaming desk helps people shift focus faster and reduces distractions.
“Short goals and strict time blocks make the space work for both creativity and play.”
- Keep tools for work and leisure clearly separated.
- Use timers and micro-goals to protect study time.
- Prioritize comfort with a quality keyboard and chair to support long sessions.
Financial Considerations for High-Quality Builds
Smart budgeting keeps high-end builds realistic and repeatable for most people. Eric saved for his $5,000 computer setup by working long hours on a local farm and making careful spending choices over time.
He recommends Economics in One Lesson by Henry Hazlitt to anyone planning a custom desk project. The book helps readers weigh price against long-term value.
Investing in a steel frame and a butcher block top costs more up front, but it prevents frequent replacements. That choice delivers better quality and reduced total cost over years.
- Plan a budget and timeline so material and labor costs match expectations.
- Prioritize frame strength and surface quality to save time and money later.
- Include cable routing, storage, and premium accessories and light in the price estimate.
- Allow extra time and funds for small upgrades like rgb lighting or ergonomic additions.
“A well-planned investment in quality pays off in durability and daily comfort.”
Overcoming Common Installation Challenges
Transporting a steel frame up a flight of stairs tests planning as much as muscle. Eric learned this the hard way when he moved a heavy mount from the garage to the second floor. The move required careful coordination and family help to avoid damage to the frame or the wall.
Baris faced a different problem: an unsquare room. That forced him and his father to measure repeatedly and shim supports so the surface stayed level. Small gaps were corrected with careful blocking and precision cuts.
Installing the heavy tabletop also took multiple people. Lifting with helpers and using temporary braces made securing the tabletop to the wall supports safe and accurate.
- Plan the move, tools, and number of helpers before you start.
- Use a stud finder and quality fasteners to anchor the frame into the wall.
- Expect the job to take many hours; patience improves final quality and safety.
- Anticipate unsquare walls and have shims, blocks, and a level on hand.
“Good planning and the right tools turn tough installs into reliable work that lasts.”
Maintaining Your Workspace for Longevity
Routine care keeps a custom workstation running like new for years. He wipes the tabletop and accessories weekly to remove dust and spills. This simple habit preserves finish and keeps materials at their best.
Every month he checks the wall frame and fasteners for tightness. Inspecting supports and hooks prevents a small issue from becoming a safety problem.
Keeping the floor clear and cables organized makes cleaning fast and reduces wear on cables. A labeled cable run and tidy storage shelves improve the user experience and save time when swapping parts.
Regular care of the keyboard, mouse, and chair protects ergonomics and comfort during long hours. Wiping surfaces, replacing mouse pads, and tightening chair hardware extend useful life.
- Clean surfaces weekly to protect finish and material quality.
- Verify wall supports and fasteners every few months.
- Organize storage and cable runs to keep the room ready for use.
Tip: Small, regular checks cost little time but keep the workspace safe and reliable for years.
Eric’s dedication shows that taking time to maintain the workspace preserves both performance and the long-term value of the build.
Conclusion
A thoughtfully designed surface can turn tight square footage into a full-featured workspace.
By choosing durable materials like butcher block and a custom steel frame, he created a stable desk that lasts. Careful planning of layout, cable management, and ergonomic accessories improves daily comfort and productivity.
Smart storage keeps the floor clear and lets the room feel larger. Proper installation and monthly checks protect the frame and fasteners so the work area stays safe.
Personal touches make the space feel like home. For gear and organization ideas, consider wall mounts and cable solutions from accessories that free floor space and add style.